Showing posts with label Google. Show all posts

Monday, August 19, 2013

Print a document directly from Android Phone

Have you ever heard about ‘Cloud Print’ and how does it work? Cloud Print is an amazing feature facilitated by Google. If you have an Android phone or tablet, you can print your documents from the device directly without sending them to your PC.

Cloud Print works with web based technology. Each time you print, your file is sent to your printer over the web. Therefore you don't need to stay near the printer. You can print a document from another country too.

Everybody now, is very hectic and feels boring to connect and send the documents between PC and phone. With this new technology, you can print your document from wherever you are. For example you can print your document from your mobile phone having a cup of tea at your office canteen.

What are basic requirements for cloud printing? Don’t worry everything you have. You need a PC with a printer, A phone running with Android OS, internet connection for both PC and phone and Gmail ID.

Here are the steps

Step1:

If you use Google Chrome first time in your PC, you are prompted to connect your browser with your Google account. If you are already connected, please skip this step. There are many advantages when you connected to Chrome. But this post doesn’t cover those advantages.
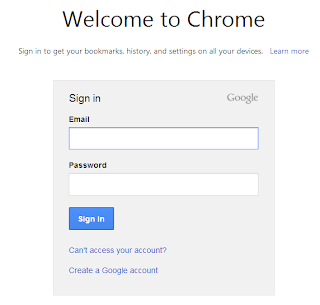
Give your username and password to connect and click Sign in.

Step2:

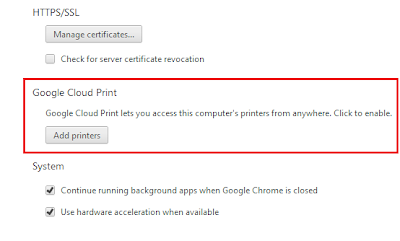
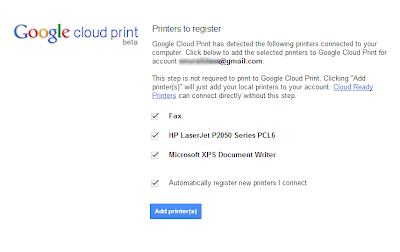
Go to Settings and click Show advanced settings… Scroll the browser till the end. You can find Google Cloud Print option. Click Add Print button. Google Cloud Print automatically detects the printers that have been connected with your PC. It also detects your virtual printers. You can add all printers to Cloud Printing service. After selecting the printers click Add Printer(s) button.

Step3:

Now this is the time for installing Cloud Print app to your phone. Cloud Print is a free app powered by Google. You can download it from Google Play Store.

Step4:

After installation, you are prompted to add to your Google account with the app. Use the same account and connect.

That’s all. Now open a picture or document with the Cloud Print app and tap ‘Click here to Print’ button.


Tuesday, August 13, 2013

Quickest way to take notes in Chrome

Quick Note is a Chrome extension that helps to take notes from various sources as quick as the other desktop applications. You can use it for many purposes rather than a note taking software such as scratchpad, clipboard or to make to do list.

How to use it?
1.    Once you added this to Chrome, it displays at start up apps list.

2.     Click Quick Note and type whatever you want.  Click [+] button to add new note. This time your previous note is saved into browser as well as cloud. Each note is saved with a title and date & time which help you to search saved notes later as the app comes with quick search facility.

3.    Click Trash button at the top right of each note to delete a note.
4.    If you find any interesting text and want to make it a note, simply select the text, right click it and choose ‘Add to selection to note’. Your text is instantly copied to Quick Note.


Synchronization with Cloud

Quick Note generally runs offline. But it uses Diigo.com to provide cloud-based storage. You can use your Google id to sign up an account in Diigo.com. Once you signed up with Diigo.com, all your notes sync with cloud therefore you can access your note from anywhere and also you can access your notes with Android device or iPad.

Future Plan

Quick Note has planned to integrate the app with other popular cloud-based services such as Dropbox, box.net, Google docs, Evernote.

Click this link to add this extension to your Chrome browser.


Friday, July 26, 2013

Use Google Translate as A Proxy

Proxy servers help you to browse the web pages that were blocked in your area or workplace. In some countries even most popular websites like youtube.com, facebook.com etc. also have been blocked for various reasons. There are numerous ways to use proxy servers to browse such websites.

Some people use softwares, extensions or web apps as proxies to visit the blocked sites. I had bad experiences with those proxies because of too many annoying adds. Some proxies do not support to play video files and they also block cascading style sheets (CSS). It results nasty look for the page.
Recently I learnt how to use Google Translate as a proxy. It works perfectly and doesn’t block video files as well as CSS. It gives original look of the page.

How to do it: Type in the address bar http://translate.google.com and also add translate?sl=en&tl=ta&u=http://example.com. Here ‘sl’ means source language and ‘lt’ means destination language. [en – English, ta - Tamil] Don’t forget to set original language of the website as destination language. Don’t worry about source language. This may be ‘en’ or ‘ja’.

For example, the following URL has Tamil [The original language of the website] as its destination language while source language is in English.

http://translate.google.com/translate?sl=en&tl=ta&u=http://lankasri.com

Thursday, July 11, 2013

How to download Google fonts for Desktop Use

If you are not satisfied about the fonts while designing something with Photoshop or any applications, it is the best way go for Google fonts. There are several stylish fonts available in Google font showcase and they don’t cost a dime. You can download them for free and use them with any desktop applications such as Word, Powerpoint, Photoshop, Corel Draw etc.


Google allows the users to use the fonts in their websites as well as download for desktop uses.
Follow the steps.

Step 1: Go to www.google.com/fonts
Step 2: Find your favorites fonts by using the tools at the left panel. Once you found your favorite one, click ‘Add to collection’ button which is at the corner of each font showcase in blue color.
Step 3: Click Download button at the top-right of the page. A fly menu will display. Choose the first option out of three ‘Download the font families in your Collection as a .zip file’. Your fonts will be downloaded as a zip file.

Step 4: Extract the zip file and select the fonts.
Step 5: Go to Control Panel > Appearance and Personalization > Fonts. Paste your fonts.
That’s all.

Monday, June 17, 2013

How to use Google web fonts in a website or a blog?

Till I found Google web fonts, I believed that serif fonts are not suitable for web designing because sans-serif like Arial and Verdana have more readability than serif fonts. With the arrival of Google web fonts, there is a tremendous change in creating web pages. Most of the professional bloggers have started to use Google fonts.

Web designers and bloggers should pay much attention on fonts while designing their web pages. You can’t attract the readers unless you use right fonts in right size. Fonts gives neatness to your pages. In my opinion, Google fonts are prettier than our usual fonts.

In this post let me explain how to use Google web fonts in our websites or blogs.

Why do we need to choose Google fonts?

Most of my friends ask me why we go for Google web fonts. The answer is simple. Google has many stylish fonts to use in web and moreover they are free of charge. While I am writing this article, Google has introduced more than 600 web fonts in its showcase. All you have to do is to add a few snippets of HTML code to your page.

How to get Google fonts?

Simply type 'fonts' after google.com/, www.google.com/fonts, it will take you to the showcase.


Google offers you many options to choose fonts. The right panels help to filter what sort of fonts you need. All the fonts in the showcase were divided into four major categories: Serif, Sans serif, display and handwriting. Another 3 options assist you to find fonts when adjusting the handles of three attributes Thickness, Slant and Width.
You can also preview the fonts as words, sentence, paragraph or poster before choosing it.

After choosing your font, click the Quick-use button to get the code.


Scroll down until you find “Add this code to your website”. Google offers you three options to use the code in your website such as Standard, @Import and Javascript. I think it is the best way to go for standard option which is widely use by designers.


<link href='http://fonts.googleapis.com/css?family=Lora' rel='stylesheet' type='text/css'>

After crabbing the code, open your page in design mode (in blogger Template > Edit HTML) place the code after title tag <title></title> probably it should be above the <b:skin> tag.


Now time for integrate the fonts into CSS. For example if you want to use it for paragraphs, the CSS code would be:

P { font-family:'Lora',serif;}

Now check your page with your browser and enjoy!