Wednesday, August 7, 2013

How to cut an MP3 file using Audacity

Audacity is a free and open source software not only to edit audio files but also to record sounds.  This is a cross-platform software which works on Windows, Mac OS X, GNU/Linux and other various operating systems.

As mentioned above, Audacity is used for various purposes. You can use it to record live audio and to edit various formats of sound files such as Ogg, MP3, WAV or AIFF. Audacity is also used to convert tapes and records into digital recordings.

This post will explain how to use the software to cut or trim a certain potion of the track of an MP3 or any audio file and save it as a new MP3 file. It is very easy to create ring tones for your mobile phone by cutting MP3 songs with this software.

To get started, at first you need to import the MP3 that you want to start with. In order to do that, go to File > Open or File >Import > Audio. [Keyboard shortcut Ctrl + Shift + I]


You can see the track of your audio file in the main window. Now click play button and watch the timeline. Notice the starting time and the ending time of the portion that you want to cut. Click Selection tool and drag along the track from starting time to ending time.


Now, go to File > Export Selection. It will ask where you want to export the file. After choosing the place, don't forget give a name to the file and to choose file format. Click OK. (You can simply skip Edit Metadata by clicking OK.)


If you want to export MP3 format, you need to install MP3 Lame Encoder in your PC.  Don’t worry. It is a small file you can download here.  After downloading the file, double click it to install.
Now click browse button to indicate the lame_enc.dll file. The location of the file probably:
C:\Program Files (x86)\Lame For Audacity


Click OK to export it as MP3.
You can download Audacity for free. Click here to download from its author’s site.

Tuesday, August 6, 2013

Have More Fun with Viber Desktop Version

Viber kept the stable place in the smartphone world. If you are a newbie to Viber, click here to know more about it. In this post, we will have a look on its newest desktop version which was the most awaited one by its users. Earlier Viber was designed for smartphones only.

Now the newest version supports for desktop computers of Windows and Mac as well as Windows Phone 8. With this new move, Viber extends its network in large. Users are now able to use this app like other VOIP services such as Skype, Google Voice, Ventrilo etc. You can make high quality HD video calls between desktop users. Further it allows to transfer the calls between mobile phone and desktop. Before you install desktop version, you must install Viber in your smartphone.


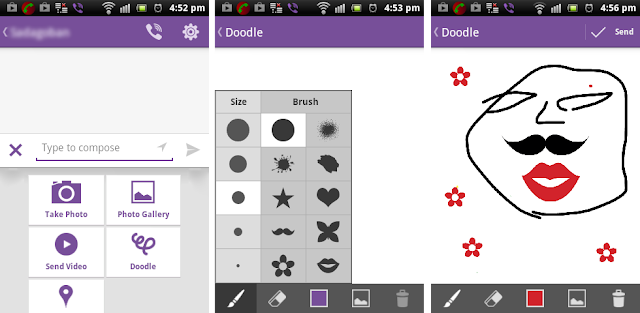
The latest optimized version of Viber has more fun and facilities. Normally Viber gives option to send text, stickers, images, videos and emoticons. The latest one has added some interesting things. Doodle is one of the funny additions. You can create your own doodles using the app and send it to your friends. The app allows to add doodle work on your pictures.


New Viber has increased the number of emoticons for text chatting people.

Another interesting and most expected feature is, now you are able to know at what time your friend saw your message. Earliest version only gave sent and delivered report.


Friday, August 2, 2013

The Best Web Apps for Color Picking

Colors play major roles while creating websites or designing graphic arts. In order to draw the audiences, a designer pays much attention on colors. Cool color combination is pleasing to the eyes of the viewers. Websites with bad color combinations do not draw the visitors’ attention even if the website has awesome contents. Colors must give comfortable to the visitors.

As we know, all the colors are generated from the three primary colors red, yellow and blue. In earliest time, very few colors were used in computers and mobile phones. But today millions of colors are used to give better effects. In past, colors were identified with their unique names. Now hexa decimal code is used to recognize them as they seem in a very big range and it is difficult to memorize.

To get the color code, we often use Photoshop color picker.


In case of not having Photoshop application in the PC you use, the best way to go for web apps. Further you can create color palettes with some web apps to integrate with Photoshop or Gimp. Some web apps gives more comfortable way to pick a color rather than the PS color picker. Though numerous web apps are available for designers, this post will discuss only 6 of them.

HSL Color Picker

It is a very simple color picker. You can pick your favorite color by adjusting the four handles. The color codes are automatically generated in the boxes under the handles.

0 to 255

0 to 255 is also a simple tool that helps web designers to find variations of any color. It displays arrayed colors (14 x 10). To pick a color code, first simply click the color that you want to start with. It will take you to a range of colors from black to white using an interval optimized for web design. Now click the variation you like and the hex code is automatically copied to the clipboard. Paste it where you want.


ColoRotate

It is one of the best web app to pick right color. You can take control of colors with the intuitive 3D color scope. Numerous predefined color palettes are available for the users. The app also allows the user to create own color palettes.

It provides iPad users many chill options. You can connect the app with CS5 or CS6 and ColoRotate instantly updates the foreground and background colors, or sends palettes to your desktop. With this great app you are able to Share the things with colleagues, clients and friends by email, Twitter, Facebook, Evernote, DropBox, or send to your photo library. You need to log in to create color palettes. (You can log in with Gmail id)
One of the cool options is that the app grabs colors from photos and produce interesting results.
Right click on each color gives hex color code.

ColorPicker

This app looks like Photoshop color picker and simply allows the users to choose favorite colors.


Color Scheme Designer

One of the favorite web apps. The specialty is that you can preview the colors in six different modes mono, complement, triad, and tetrad, analogic and accented analogic.  Once you chose the colors, you can export it as color palette format of Photoshop or Gimp.


  Colllor

Once you picked up a color it shows big rang of variations for the specific color.

Wednesday, July 31, 2013

How to re-size a photo with Photoshop

While creating a website, sending through email or uploading to social networking sites, we need to resize our photos. If a photo is very big in size, obviously it will take much time to upload or download. Moreover it is not necessary to share large size pictures into social networking sites. We can reduce the size of the picture without losing its quality.

I always use VSO image resizer software to reduce the size of the pictures. This simple software quickly reduces a bulk of photos within a minute. It also helps to watermark your pictures. Some online web apps also do this job with limited access.

But this tutorial will explain how to reduce a picture size with the great photo editing software, Photoshop. To get started, open your picture with Photoshop and go to images > Image Size (Keyboard shortcut for PC CTRL + ALT+ I).


Image size window appears. You can see the actual size of the picture. [In my case, width 4928px and height 3264px.] I would like to reduce the size into 800px. Before going to change the width, make sure if all the three checkboxes are ticked. (Scale Styles, Constrain Proportions and Resample Image).


Bicubic’ is the default resample tool used for reducing. But I suggest ‘Bicubic Sharper’ for better reduction. If you want to use this tool frequently, it is better to make this default by choosing Edit > Preference > General. Pick ‘Bicubic Sharper’ in Image Interpolation and click OK.


 It should be noted the re-sized image is 159 KB in size. Original size is 4,104 KB.

Monday, July 29, 2013

How to Sign Out Facebook Remotely

Sometimes you may forget to log out your Facebook account after using it at office, net café or your friend’s house. If the PC you used is online, anyone can misuse your Facebook account. Don’t worry. Facebook offers you an option to log out your Facebook account remotely. You can also use your mobile phone to do this task.

To get started, log in your Facebook book account from your home PC or mobile phone [I did it with Opera in mobile]. Go to ‘Account Settings’ and click ‘Security’ at the left panel.


Now click 'Edit' against ‘Active Sessions’ to notice your recent activities. Each activity shows the device and the browser you logged in recently and also shows date, time and location. If any information seems suspicious, click “End Activity” to log out the account from the device remotely.


After clicking 'End Activity' button, the remote PC will show this message.

Friday, July 26, 2013

Use Google Translate as A Proxy

Proxy servers help you to browse the web pages that were blocked in your area or workplace. In some countries even most popular websites like youtube.com, facebook.com etc. also have been blocked for various reasons. There are numerous ways to use proxy servers to browse such websites.

Some people use softwares, extensions or web apps as proxies to visit the blocked sites. I had bad experiences with those proxies because of too many annoying adds. Some proxies do not support to play video files and they also block cascading style sheets (CSS). It results nasty look for the page.
Recently I learnt how to use Google Translate as a proxy. It works perfectly and doesn’t block video files as well as CSS. It gives original look of the page.

How to do it: Type in the address bar http://translate.google.com and also add translate?sl=en&tl=ta&u=http://example.com. Here ‘sl’ means source language and ‘lt’ means destination language. [en – English, ta - Tamil] Don’t forget to set original language of the website as destination language. Don’t worry about source language. This may be ‘en’ or ‘ja’.

For example, the following URL has Tamil [The original language of the website] as its destination language while source language is in English.

http://translate.google.com/translate?sl=en&tl=ta&u=http://lankasri.com

Thursday, July 25, 2013

How to download a file directly to Dropbox

Dropbox is one of the most popular cloud storage that lets you to save any files such as photos, audios, videos and software into it and allows you to download them from anywhere as well. Generally if people find anything interesting on the web; first they download it and upload to cloud storage. The big problem is, while they use data package for  internet purpose, large amount data is spent for downloading and uploading.

If the file is uploaded directly to the cloud storage, it does not use a single byte of data for this purpose because the file is transferred through the clouds.

Here are few ways to upload a web file to Dropbox.

Use Google Chrome Extension

A simple extension called ‘Download to Dropbox’ makes the things easier. Head over to Chrome webstore to add the extension. After adding to your Chrome browser, you can download a photo or any file by right clicking on it.

Sometimes it might take a couple of minutes but eventually it will be downloaded into a folder which was created while configuring it.

Use a web app ‘Save web files’

Save web files’ is a little web app assists you to download a web file directly to the any cloud drive; Dropbox, SkyDrive, Google Drive or Box. Right click on the file that you want to save and click ‘Copy Link Location’. Paste the URL into the box and click your cloud drive. This app is powered by Ink File Picker.


After linking with Ink File Picker, select a folder and give a name to the file. [Don’t forget to put the extension] Click ‘Save As’. That’s all the file will be downloaded to the folder in no time.


Wednesday, July 24, 2013

How to move Android Apps to SD Card


Every time when you install an Android application, it is automatically saved in internal storage of your device. Usually internal storage is smaller but most of the apps are running from here. The storage will be filled with a few apps and then will give ‘Low disk’ warning message.

If you want to install a new app then you need to uninstall another installed application. Furthermore your phone also needs certain space to run apps. Moving the installed applications to an external storage is the best solution to keep the space in the internal storage.  Some applications can be moved to SD card (external storage) but some are not. They must be always run from the internal storage which is mounted and cannot be removed from the device.

Moving an application to SD card is quite simple and easy but you may not aware of it. This tutorial will help you how to do it.

First, tap ‘Settings’ button on your phone or any Android device. Then go to ‘Application > Manage Applications’. It will show what the applications are installed and how much of memory is available in your device.


Tap an application which you want to move to SD card then tap ‘Move to SD Card’. If the ‘Move to SD card’ button is inactive, you are not able to move it into SD card. It means it should be run from the internal storage. If you find ‘Move to phone’ button instead of ‘Move to SD card’, it means the app has been already installed into SD card.


Tuesday, July 23, 2013

Shut down Windows 8 with 1 Click

Windows 8 came with nice look and well improved UI. Though it was especially designed for touch screen systems, it also works perfectly with mouse and other pointing devices.

How to shut down the system? This is the first experience most of you should have when you started to use Windows 8 because it doesn’t have the shut down button at its usual place. Then you have learnt how to do it though. By clicking the at the top-right corner of the desktop, you will get charms sidebar and go to settings > Power > shut down. [Win + C shortcut also brings the charms menu].
Nevertheless it needs 4 clicks or taps to turn off the PC. Alt + F4 also gives the quickest way to shut down.

Is it possible to shut down Windows 8 with just one click? Yes it’s possible. Let me explain how to do it. Here you don’t need to download any extension, software or codes.

1. First create a shortcut for shutdown process by right clicking on the Desktop and selecting New > Shortcut

 2. Type ‘Shutdown /s /t 0’ without quotes in the box provided (/s means shutdown the PC with a timeout of zero seconds (/t 0).  Then hit enter key and click ‘Finish’.


3. Now you will see a shortcut on the desktop. The double click of the shortcut will turn off the PC but this tutorial is extended till pinning the shortcut to metro tiles.


4. To change the icon of the shortcut, right click it and choose properties.


5. In the properties box, click ‘Change icon’ button and choose the regular icon for shutdown.


6. Now again right click the shortcut and choose ‘Pin to start’


Now you can shut down your pc with one click.


Friday, July 19, 2013

Customize Gmail background image with your own photo

Customizing the themes of Gmail is always fun. You can personalize your Gmail background with various themes provided by Gmail from istockphoto.com. It also allows you to create themes completely on your own.

A photo can be picked from your desktop PC, camera or picasa web. If you found a nice picture with good quality, copy its URL and paste it in the space provided. It reduces the time of downloading and uploading.

First let me explain how to use a photo from desktop PC. I suggest dark background pictures to give rich personalized look.

To get started, all the time you need go to Settings > Themes. Scroll down until you find ‘Custom Themes’. Now click ‘Light’ or ‘Dark’ which means the inbox color. There is no problem what you choose and you can change it next time. It will take you a fly menu which consists of the means to pick a photo.


Choose ‘Upload Photos’ from left panel and then click ‘Select photos from computer’. That’s all.

Pick the photo from Picasa web.


To choose a photo from picasa web album, click 'My Photos' which lists out your picasa web albums. Choose a photo from an album and click ‘Select’.


No wonder, click ‘Paste a URL’ to set a picture from another website.